In my ebook Information Security for Small Businesses, I described how to securely browse the web. One of the techniques is to make sure that the websites where you’re doing secure transactions are using HTTPS (also known as HTTP over Transport Layer Security (TLS)). This means that all the traffic flowing between your browser and the website’s server is encrypted, preventing anyone else from eavesdropping on the transaction and potentially collecting sensitive information.
You can tell when a website is using HTTPS by whether or not it has a padlock or similar symbol in the address bar of the browser.
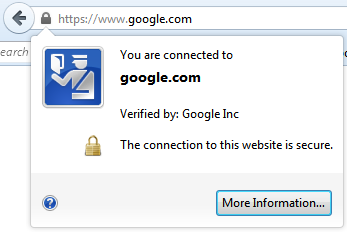
If you click on the padlock, you can usually get information about the secure connection.
When you see that padlock, you can be assured that all communications between you and the website are encrypted.
As a business owner with a website, you can offer the same level of security to everyone browsing your site, too. You definitely want to offer HTTPS encryption if you’re doing any type of e-commerce or any other sensitive transactions.
Like I advised in my previous ebook, you should avoid e-commerce transactions with websites that don’t have HTTPS because all of your sensitive information is being sent “in the clear.” Similarly, many potential customers will not buy anything through your site if you don’t have HTTPS either.
But what if you aren’t doing any e-commerce or sensitive transactions through your site? What if your site is just an “online brochure” for your business? Do you need to have HTTPS then?
It turns out there’s a very good reason to use HTTPS even if you aren’t doing e-commerce or sensitive transactions with your site: Google gives preferential search ranking to sites that use HTTPS. As part of their “HTTPS everywhere” initiative, Google is trying to make sure that websites people go to after a Google search are secure. So they are giving a small search engine ranking boost to sites that are using HTTPS. While this isn’t really a direct security benefit to you, it’s nice to get a small reward for good security.
Unfortunately, enabling HTTPS isn’t simple, and to do it correctly, it won’t be free. You can get an idea of the level of technical effort it will take to set up HTTPS by reading this Google Webmaster Tools article about it.
In a nutshell, you need to buy a security certificate (more on that in a minute), install it on your webserver, and make a series of technical changes to your webserver and the code on your web pages themselves to enable HTTPS. Then you need to troubleshoot any problems you run into if it all doesn’t go perfectly.
Unless you have confidence in your technical web skills to pull this off yourself, you might want to consider outsourcing this task to someone who’s done it before. You can go to freelancer websites like oDesk and quickly find experts with the skills to enable HTTPS on your website. Simply create an oDesk account then describe and post the task. You’ll either get freelancers contacting you to work on it or you can reach out to specific freelancers directly. For a task like this, you might want to negotiate a flat rate versus an hourly rate.
But before you do that, though, you’ll need to have a certificate. A certificate is a text file issued by a certificate authority (CA) which basically vouches that you are who you say you are. This is important because it assures users that they’re really communicating with the website they expect to be talking to, not some imposter.
The certificate will contain information about your identity, information about your public key which is used to create the HTTPS connection, and the digital signature of the CA where you bought the certificate from. The CA’s digital signature indicates that they verify the contents of the certificate are correct.
There are many possibilities when it comes to getting the certificate you need to enable HTTPS. You might be tempted to go the free route with a self-signed certificate, but doing so will create more problems than it will solve. Most damaging will be the obvious warning people browsing your site will see telling them that their connection is not secure.
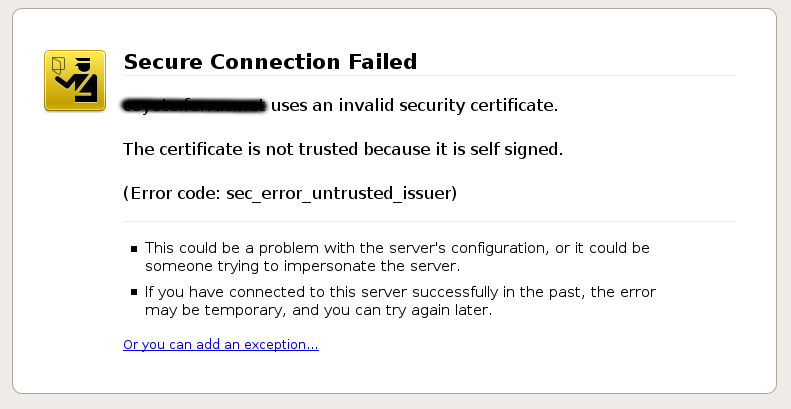
Rather than giving them the sense that their information is being protected, self-signed certificates will make people nervous that there’s something wrong with your site and probably avoid coming to it until the warning goes away.
Your best bet when getting a certificate is to buy it from a trusted certificate authority. The more widely trusted the CA is, the more browsers will accept a certificate from it as a voucher that your site is valid and trustworthy.
Finding a trusted CA can be a little tricky, because if you go to Google and search for “best certificate authority” you’ll get a confusing mess of certificate authorities and websites promoting certificate authorities. The chances of finding a good one that way are pretty slim.
A better approach would be to use a neutral directory like DMOZ, which lists certificate authorities here:
A Note About “SSL”
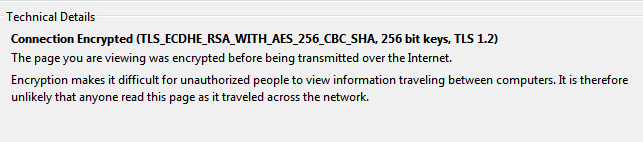
In many cases, you’ll see the certificates referred to as “SSL” certificates. The truth is, SSL is an outdated cryptographic protocol and it’s not secure. The current protocol is TLS, which you can confirm by clicking on the padlock on a website with HTTPS.
Why do people still call them “SSL” certificates? As this page on the ZyTrax website explains, “SSL” is a colloquialism for X.509, which is the name of the standard followed when creating public key certificates. But who wants say “X.509 certificate” when you can just say “SSL certificate”?
You’ll see a list of certificate authorities, some which sell certificates directly from their websites and some which don’t. You can go through the list and research the various benefits each CA offers and the costs they charge. After doing similar research, I choose Namecheap.com to purchase my digital certificate from. As their name says, Namecheap.com offers inexpensive digital certificates among other products and services.
NOTE: Before going through the process of purchasing a certificate, you’ll want to make sure your website is being hosted on a dedicated IP address. It will be very hard if not impossible to get your certificate to work if your site isn’t hosted on it’s own IP address. It’s just easier to complete the certificate installation process if you’ve already got your own IP.
There are different types of certificates you can buy depending on what level of trust you want to establish with the people browsing your site. The very basic certificates will just verify that you own your domain. More involved certificates will mean more validation from the certificate authority that your business and your site are trustworthy. They will also cost much more than the basic certificate.
I went with the basic certificate, but you’ll have to decide what level of certificate is right for you.
Here’s the process I followed to set up HTTPS on SecurityElements.com:
- Bought certificate from Namecheap
- Generated a private key (I followed the instructions here: https://www.namecheap.com/support/knowledgebase/article.aspx/9445/0/cpanel)
- Generated a certificate signing request (CSR)
- Activated my certificate with Namecheap
- Uploaded my certificate to Hostmonster
- Contacted Hostmonster tech support to install the key and .CRT file on the server (I followed the instructions here: https://my.hostmonster.com/cgi/help/204)
- Troubleshooting: Removed mixed content (hard-coded references to HTTP:// links) on my site
- Confirmed that HTTPS was working
- Went to Qualys SSL Labs site (https://www.ssllabs.com/ssltest/) and tested SecurityElements.com (I got an “A” overall rating!).
- Edited .htaccess file to force redirect to HTTPS
- Added https://www.securityelements.com and https://securityelements.com to Google Webmaster Tools
I have a slideshow with images and screenshots that follow this process on SlideShare here:
As I said earlier, it is fairly technically involved to enable HTTPS on your website. Hopefully this will help you determine if it’s something you can do on your own or if you need technical assistance.
I hope you decide to enable HTTPS on your site if you do any type of secure information transfers to or from it.
If you have any questions, please post them below.
Photo credit: mripp